
The previous post in this series showed how to draw a simple house using PowerPoint “3D” and how to overcome some common problems. This post will present two more detailed examples.
Making these examples was tedious. The level of detail I used (steps, porch railings, etc.) takes a lot of work. You might want to make less detailed versions, especially since the houses are likely to be used at a small size (e.g., in a cityscape or village).
My general approach is this:
- Find an example. I have used actual house plans or architectural renderings. An example with both front and side elevations is useful but not necessary – you can create a simple side view given a front elevation. Flat drawings are easiest; a perspective drawing or photo may be harder to use.
Using architectural drawings as a starting point will help assure that the proportions of your house are realistic as well as provide inspiration.
- Using the example, create a simplified front elevation. I do this by “tracing” over the parts of the example drawing using rectangles and other standard Shapes.
- Next, create a simple slide elevation using Drawing Guides to align the parts with the front elevation. Use a side elevation from your example as a guide (if available).
- Using the method outlined in the first post, create the top (or “plan”) elevation.
- Create a trial 3D construction assuring that the parts are consistent (again, see the first post for an example).
- Add details (windows, doors, trim, etc.) along with colors.
- Create the final 3D construction.
Here’s how I “traced” the first example (I think this is a “bungalow”):

You can see the red shapes over the gray original drawing; the house outline, porch posts and the porch roof have been simplified.
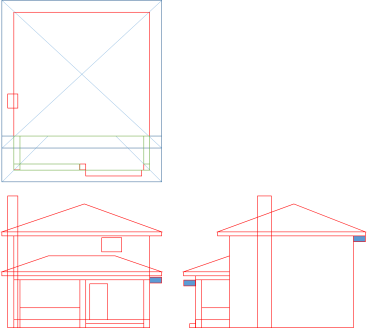
Here are the front and side views:

I used Drawing Guides, Snap to Grid and 0.05″ grid spacing to make it easier to draw and align the parts. The blue rectangles are used to assure a consistent roof overhang.
Here are all three views:
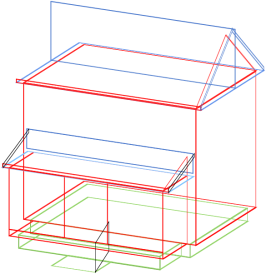
Next, I used these views to create a trial 3D rendering. I used the Off-Axis 2 preset rotations; in earlier posts, I used the Isometric presets. Here’s my trial version of the main part of the house:

You can review the first post to see the details of this process. After building the base and the walls, the top view including the overhang (blue) is aligned with the top of the walls. The fascia pieces are added, aligned with the overhang outline. The hip roof is constructed by centering a front view of the roof (green) on the roof top view. This establishes the peak and corners of the roof allowing me to draw the front face of the roof as a Freeform (yellow).
Next, create the intersection of the chimney and the roof; here’s a picture:

I made 2 copies of the front view of the roof with the chimney (green). I aligned these with the front and back of the chimney outline in the base bottom view. This locates the intersection of the chimney with the roof and allows me to draw the front and side views (black) of the part of the chimney above the roof.
Next, I added details and color to the elevations of the main part of the house and completed the roof and the chimney:

I tried two ways to construct the porch, after adding color. The first involves selecting and rotating the various “faces” of the porch parts and carefully assembling them to form the porch. This diagram shows the process:

The front to back order is important here as well as the alignment.
The second approach also involves selecting and rotating faces of the porch parts but uses 3D Depth to add, well, depth. Here’s the process:

As you can see the depth process is simpler but it is more difficult to get consistent colors. You must pay attention to the (mysterious) 3D Lighting Angle as well as the fill color. You can decide which is better for your project.
I completed the porch roof by adding the trim pieces around the top of the columns, aligning the top view of the porch (including the overhang), and adding the fascia pieces. Then, using a front view of the porch roof as guide I drew the roof surfaces:

Here’s the final assembled bungalow:

The second example is a cottage; here are the source drawings and my “tracings:”

Here are the three views constructed from the “tracing:”

I used a Parallelogram for the fascia pieces on the ends of the two roofs and the outline of the porch step railing. However, I manually rotated the shape and PowerPoint 3D has a problem with rotated shapes; the 3D rotations are created relative to the original orientation. This is hard to explain – try it and see. I overcame this in two ways: I grouped the shapes (end of the main roof) and I redrew the shapes as (black) Freeforms (the end of the porch roof and the outline of the step railing).
Here’s the trial 3D rendering for the cottage:
Here’s the cottage with added detail:

I used Lines in the porch railings; this will work at this scale but remember that, if you enlarge the house, the Line width (like all points-measured dimensions) will not enlarge. Since I plan to convert (Copy/Paste Special) the house drawings to pngs, this will not be a problem.
After adding color, I first built the foundation on its outline:
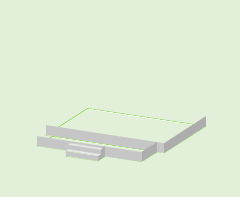
Next. I added the house walls and the porch floor structure; the house outline overhangs the foundation:

Next, I added the porch railings, the roof gables and the fascia pieces. I used the Depth technique for the porch railings since there are so many parts. The lighting/color for the railings is not quite correct but at least it’s consistent.

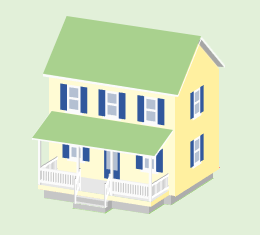
Here’s the complete cottage:
If you would like to build some houses, use the link below and click on the PowerPoint icon to download a free “source” PowerPoint file containing these projects:
See this page for more on downloading files.
If you have questions, praise or complaints, please add a comment below. If you appreciate my efforts, liking or following this blog might be a good idea.

1 Response to “Drawing in PowerPoint – 3D Houses”