Color is a key design element in PowerPoint and there are a lot of ways to get color into your presentation. This post (and Part 2) will explore the sources of color in PowerPoint.
HISTORICAL NOTE: In the long, long ago, a thing called an “overhead projector” was used for presenting “foils” or transparencies. They were made on a “Xerox” that copied typed material to special transparent plastic sheets. Some radical pioneers used color pens to add color to bullets, etc., on the otherwise black and white projections.
I highly recommend that you consistently use a small set of colors (a color scheme) in your presentations – this will help assure a professional, unified impression on your audience. Please don’t make it up as you go along.
In PowerPoint, the tool for helping assure a consistent appearance, including the color scheme, is called a Theme. More about this later.
A couple of other tips:
- You may not have a free choice of colors; if you are a corporate wienie (or working for one), there will probably be branding standards, including colors. Even for small organizations, you may want to be consistent with a logo or website.
NOTE: An earlier post describes a method for creating a color scheme based on corporate guidelines.
- If you are not a graphics designer, and even if you are, look for inspiration; web sites, apps, television ads, etc. The PowerPoint Eyedropper tool can be used to “steal” colors from photos, screen shots, etc. (see Part 2).
- Use only three or four “accent colors.” Any more will be confusing and make your presentation look less organized.
- Occasionally, you will need a color or two that is not in your scheme. For example, you want a stop sign icon or a (US) fire truck and red is not in your color scheme.
- “Color blindness (color vision deficiency, or CVD) affects approximately 1 in 12 men (8%) and 1 in 200 women in the world” (colourblindawareness.org). That means there’s a pretty good chance that some in your audience will have difficulty distinguishing certain colors. Guidelines for designing for CVD are available (here, for example).
NOTE: These guidelines make pretty good sense for the rest of us; I suggest you take a look.
Basics
Your first encounter with PowerPoint color is liable to be this Color Pane:
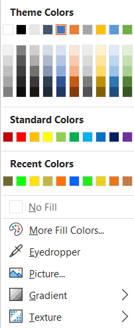
This pane appears when you select Fill or Outline color for shapes, lines, text, etc. on the Home ribbon, the Drawing Tools ribbon and several other places including the Format Shape pane.
Under Theme Colors, the first row indicates the 10 colors specified in the Theme for your presentation (this is the Color Scheme for this presentation). The Color Scheme determines the default colors for various objects and offers other color choices that, presumably, you have carefully selected to coordinate. In this post, I have used the Office Theme, the default option.
You should (almost) always use colors from this row.
NOTE: You can change your Color Scheme and other elements of your Theme including default fonts and Slide Layouts (e.g., Title slide). You can select Themes from Microsoft and other sources or design your own. See my post on Themes or this excellent article to learn how to create a custom theme.
NOTE: I am surprised at the number of PowerPoint users I have encountered that don’t understand Themes, including graphic designers. Many struggle to create a consistent appearance manually; some use the word “template” to describe a model slide and/or a color scheme.
The Theme Colors have particular roles that you should be aware of; these are hinted at by the labels attached to each color:
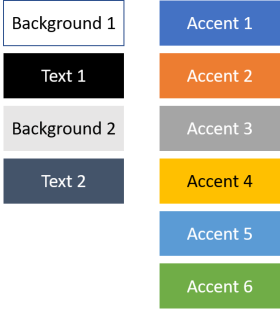
The Background 1 color determines the presentation slide background color (white for this “Office” Theme). The Text 1 color (black) determines the default text color. You should pick these two colors so that there is considerable contrast between background and text.
NOTE: In some contexts, these colors are called Light 1 and Dark 1.
Background 2 and Text 2 are apparently intended for similar purposes although I don’t think these colors are involved in any defaults or other features.
NOTE: You can change the default slide background color and use fill effects, images and other objects to build your slide backgrounds using the Format Background pane. See this post for more on slide backgrounds.
The six Accent colors complete your color scheme – use the first three or four of these for everything unless you have a good reason to use another color.
The Accent colors are also used by Tables, Smart Art and Charts to offer a several color options for these objects. See Part 2 of this post for more on this.
The next five rows (a total of 50 (!) colors) are variations of the 10 Color Scheme colors. These are based on the Theme colors but vary in lightness and darkness. Using shades of a single color can have problems so use this with care (if at all). See Part 2 for more on this.
The next row is called “Standard Colors” – I’m not sure why because they are in no sense “standard” in PowerPoint. Avoid these unless you need red for a stop sign, etc.
The last “Recent Colors” row displays non-Theme colors that you have recently used, maybe as a result of an Eyedropper operation. If you are using a color from this row, maybe it should be in your Color Scheme! Again, avoid these colors unless you have a good reason to use one of them.
The next option on the list is More Colors. Why on earth do you need “more colors?”
If you are creating a presentation with an appropriate Theme, you shouldn’t need “more colors.” On the other hand, if you are creating a Theme, this is where you actually specify the Theme colors. You should use this tool only to build your Color Scheme. Do not dip into this pot just because you feel like it.
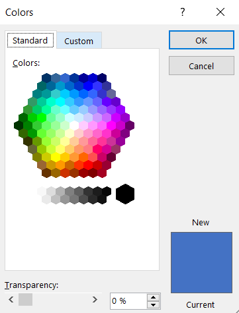
Selecting More Colors reveals, not surprisingly, the Colors pane. The Colors pane has two tabs: Standard and Custom. Here’s the Standard tab:
In the Standard tab you can select from an array of 127 pre-set colors or one of 15 grayscale options. Again, there is nothing standard about these colors; this is just a way to select “common” colors.
Notice that there is a Transparency option – you should use transparency when you actually want a transparent object, not to create a color variation. The reason for this is fairly obvious: you probably don’t want the color to change when you move, copy or share the object, depending on what’s behind it.
The rectangle at the lower right allows you to compare the Current color of the selected object with the New color that you have selected from the array.
The other tab is Custom; it provides a another way to select colors:
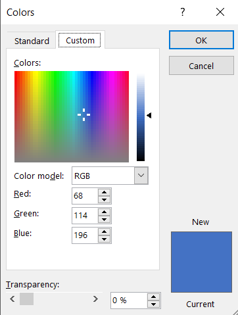
You can select colors using this pane by moving the “cross” around the “rainbow” box and by moving the slider on the right. Note that there is a “color model” option; the default is “RGB;” it’s much easier to understand what’s going on in the color pane if you select the alternative “HSL” model:
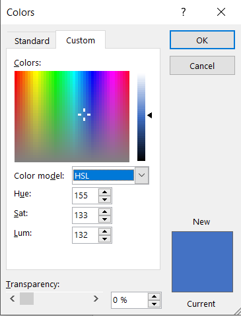
A color model is a mathematical way to represent or encode colors using numbers (essential in the computer world); this turns out to be complicated because of the nature of human vision. PowerPoint offers two options: the RGB (red-green-blue) model and the HSL (hue-saturation-luminosity) model. Each of these uses three values to uniquely identify the color. There are other models and variations in use; you may have encountered HTML or CMYK (used in print work) for example. Web sites are available that convert encoding between models.
With the HSL model, it is easy to see how the color selection works:
- Moving the cross horizontally changes the color (Hue); note how the corresponding numeric value changes (0-256).
- Moving the cross vertically changes the “grayness” or Saturation of the color from solid gray to a “pure” version of the color.
- Moving the slider changes the “lightness” of the color from black to white at the extremes.
- You can also enter the HSL/RGB numeric values directly. This is necessary when you are creating a color scheme using a corporation’s color scheme or other source since the Eyedropper option is not available.
NOTE: The HSL model seems much more intuitive to me than RGB – I have no clear idea what will result from changing the Red value of a color, for example.
The HSL model also provides some insight as to how the 50 variations of the Theme Colors (see above) are produced. For example, the first row is labeled Lighter 80%. In HSL terms this means that the luminance of the variation is 80% “lighter” than the corresponding theme color. Since “lighter” means higher values of the luminance number, the luminance of the variation is 180% of the luminance of the theme color. For the Accent 1 (blue), the luminance is 132; the luminance of the first variation is calculated as 1.8*132=238. The hue and saturation values are unchanged. Here are the calculations for five variations of the Accent 1 color:

NOTE: Some of the calculated values of the luminosity differ slightly from the PowerPoint value. Also, the Hue and Saturation values vary slightly among the variations. This may be because a the colors were specified using the RGB model.
Defaults
The Color Scheme determines the default colors for Shapes, Lines and Text. Here’s the default Rectangle determined by the “Office” Theme:
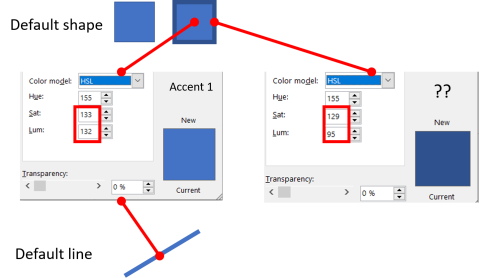
The default Rectangle has a blue Fill and a narrow Outline of darker blue – I copied the Rectangle and increased the width of its Outline for clarity. The default Fill is the Theme color called Accent 1. The Outline, however, is not a Theme color, not even one of the 50 variations (![]() )!
)!
NOTE: This inconsistency is a signal of more shenanigans in PowerPoint color yet to be revealed.
NOTE: Regular readers of this blog will know that I use the icon (![]() ) to highlight PowerPoint stupidities in a refined and inoffensive way.
) to highlight PowerPoint stupidities in a refined and inoffensive way.
The default Line color is Accent 1 – again, I have increased the default width for clarity.
The color scheme also determines the colors of default Text:
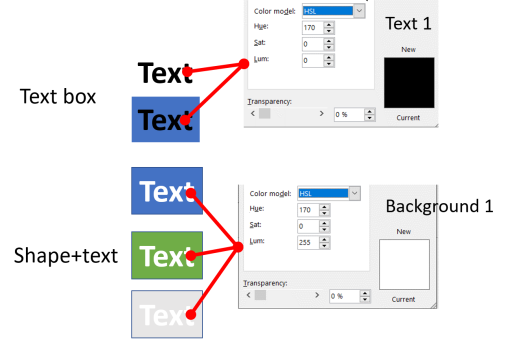
The first example is the default Text Box (created by using the Text Box Shape from the Shapes menu, for example). The default is no Text Outline and the Text fill color is Text 1 from the color scheme. There is no Text Outline and the Shape containing the text has no Fill or Outline.
NOTE: If you want to change the default Shape, Line or Text, create the version you want, right click, and select Set as Default … .
If I add a dark Fill to the shape (the second example), there is poor contrast between the text and the fill but no (automatic) change of color occurs.
On the other hand, if I type text into a shape with a dark Fill (the third example), the Text Fill is automatically set to Background 1 (white), presumably to improve the contrast. But, if I change the shape Fill to lighter colors, the Text Fill is not changed (second and third examples). As you can see, the light gray example is unacceptable.
What we have here, gentle reader, appears to be only a half-assed attempt to automatically avoid poor contrast (![]() ).
).
Ironically, PowerPoint’s own “Accessibility Checker” flags the blue, green and light gray text boxes as having “hard-to-read text contrast.” PowerPoint does not like its own choices (![]() ).
).
The next post in this series will explore other PowerPoint tools for creating color.
If you have questions, praise or complaints, please add a comment below. If you appreciate my efforts, liking or following this blog might be a good idea.

Hi
What I need to do it make the Accent 1 colour white for fill but also make the line “no line” as we use “white” boxes for blanking out sections of text.
I can do it once in a presentation but it will not “hold” so that when I open PowerPoint anther time, I have to go through the rigmarole of changing “accent 1” etc…
any ideas, please
Thanks
Chris
LikeLike
I’m sorry – I don’t understand what you are trying to do. If you need white, no-line rectangles, simply make one , set the attributes and duplicate as needed. Changing Accent 1 is not necessary.
LikeLike
Thank you so, so much for replying.
Yes, I can do that for one PowerPoint presentation.
But when I close/save that PowerPoint, it goes.
And I have to repeat the process of making it,
I thought that by reconfiguring the Accent 1, it would “stay” like that on my computer for every further [presentation.
Thanks for replying
Regards
Chris.
LikeLike
I think, that i understood your problem. I will shortly summarize it in my word. You want to use a standard form for every “block” without having to copy paste it (not only the fill, the outline as well). If this is your problem, I can help you. There are multiple ways to achieve your goal. Option one (more complicated) is the “SlideMaster” the slidemaster is the place where all your layouts are Saved, (you can find it when you type “SlideMaster View” in the search bar). If you are there you will see many slides. One of them isn`t indented; if you change the outline/fill there it will save it to all the other layouts that are indented. This means that, after you leave the Masterview (X on the Slidemaster feed) every textblock will have the outline / fill you used! The benefit, when you make a new slide it will have these. You can make the Title block different and it will be saved after closing. Additionally, if you are unhappy with it you can make one change in the Masterslide and your whole presentation will be updated. Minus; If you insert a new Textbox /shape, via insert -> shape _ textbox/shape (or how ever you do it) it will still be “invisible”. The easy solution. Change the inserted Textbox /shape into your wanted default appearance (even the fonts will work). After you changed your shape (in April you wanted white fill with no outline) use Rightclick, and click “Set as default Textbox”, now every textbox that is inserted via “Insert” will have these settings, you can also apply this trick for any other objekt, if you make right-click on an inserted form, change it, right-click and “Set as an default Form” it will be your default form for this presentation. Sidenote this trick doesn`t work with the Placeholder, the placeholder changing only works with the SlideMaster/first trick. If you want to use one default form for every future presentation you have to make a Template, I will explain it shortly. You could take your current presentation (with the default bloxs) and then go to then below the file name (would recommend Template_Nameoftamplate(whitebox,nooutline) change the saving type, so instead of *.pptx use *potx (powerpoint template). Finished. If you create a new presentation you need to click on custom templates >start-powerpoint-New-Custom-Template_Nameoftamplate (in windows powerpoints it is below the Blank Presentation to the right.). And voila you are finished, if you want to make it even better, you could make a template out of a new Presentation, then you can avoid the clearing of slides you don`t need. Almost the end. Be aware, that if your default textbox background was chosen out of an theme color, changing the theme colors will change your default textbox if you always want to have the same, without loosing your freedom of changing the color theme, copy the RGB code and enter the RGB code when changing the color in the template. This was a lot of input, you might have some struggles with it, but feel free to ask me (@PKTPowerpoint on twitter I probably will respond more quickly there). And that was it have a nice day
LikeLike
Did you create this presentation yourself?
LikeLike
Hi
Thanks for the reply…
Yes.
from the beginning…
open a new PP
remove the add a title and add a subtitle “boxes”
insert a picture from file
then
insert
square box from the dropdown
it comes out blue with a black outline
amend to no fill and no outline
adjust the position to cover the part of the photo we want hidden from the students we teach,
Same if we insert a text box, fill it with words and cover the lower half of the words, usually in a “foreign” language, so the students can begin to know what the words look like without seeing all of the word (a very useful learning tool)..
Thanks
Hope that helps
Regards
Chris
LikeLike
Is the box fill “no fill” or white?
LikeLike
Hi
White – so it covers whatever it lies on
Thanks
Have a great long weekend – at least it is here in the UK
Regards
Chris
LikeLike
I’m stumped.
LikeLike
Hi
Sorry to have set you such a task.
O think it is one of those Microsoft things – like why every new slide in a presentation HAS to have the title and subtitle boxes..
It does make me wonder where they use “accent 2” as the default.
Thank you so much for your time
I’ll keep hunting – maybe even ask those awfully nice people at Microsoft!!!
Be safe, be well
Best wishes
Chris
LikeLike
You can modify slide layouts (slide masters) to contain (or not) whatever you want – see my post “PowerPoint Secrets: Slide Masters, Layouts and Placeholders.” Using the “title slide” layout may be the reason you are having problems…?
LikeLike